It’s a shame that we can’t like individual images, but the first one you showed the sandbags on top of the structure was something that I’d seen in the VGs, but not in TT. I also love your widow frames. Are they custom or did you find them somewhere?
I was a bit aghast when I saw that you’d used GREENSTUFF to make sandbags. I mean, it WORKS, obviously, but so much greenstuff!  Personally, I prefer to use two-part epoxy putty that comes in tubs – either Magic Sculpt, Magic Sculp (same stuff, just with a weird variant spelling), or Apoxie Sculpt (seems to be effectively the same, but is from Aves). Fortunately for me, there’s a local store that actually carries Apoxie Sculpt, so I don’t have to put up with the shipping and handling, and I get it in packs of 1 or 5 lbs a pop. (Yes, I’m crazy enough that I actually can go through that much.)
I save the green stuff (or, actually, I prefer the “aluminum-brown-stuff”) ribbon epoxy for fine detail work, such as custom faces or clothing. For that, Apoxie Sculpt (etc.) doesn’t work very well, because it doesn’t have the same rubbery-stretchy consistency as ribbon epoxy – get TOO fine in detail work like that, and it’s more likely to break into “crumbs.”
However, I use it a lot for when I want to make custom bases with texture stamps: it mashes out rather nicely, and I can wet down a texture stamp or roller and then squash a texture into it fairly easily. It also works very well with push-molds, even to the point that if allowed to cure against a very smooth surface (glass, etc.), the cured putty surface will be just as smooth even to the point of being shiny and plastic-like. (Not that I often want to do that in particular, but I’ve sometimes made use of that in conjunction with a texture stamp to get a really nice-looking tile-mosaic floor surface.)
It also works well when I’m trying to build up a model from polystyrene sheets, foam, illustration board, etc., and I want to do some gap-filling on the corners, or even build a rounded corner. The surface can be blended well by wetting it down, and once the stuff cures, it can be sanded.
… And, by the way, I love your detail work on the building!  That grimy plaster “wallpaper” is rather effective!
Great tip, thank you …I have done just as you suggest and it definitely helps blend it in. It’s the little things.
They are just strips of MDF sprue from the kit glued around the openings. Super simple but take it up a level.
Yes, I wont be doing that again. Definitely not an economical option. Unfortunately I had started before I had realised how much greenstuff It was going to use, so I just ran with it. I’ve been looking at Apoxia Sculpt as you suggested. It’s still pretty expensive but the cost per pound it a lot lower than greenstuff and I’ll probably be getting some. The only thing is I’m not sure I’ll need 4 pounds but that is the point at which it starts getting cost effective. I’m still mulling it over. For future sandbag projects I might end up going with a lozenge of DAS wrapped in fabric elastoplast bandage and then painted with PVA. I saw this Russian guy doing it on youtube and results looked pretty good.
Thanks for the input guys.
OK, bit of a hut update. It’s been a couple of weeks but I’ve snagged an hour or two here and there. I made a little stove pipe for the roof from brass tube, wire and pepsi can…
Works well. Looks good on the model. I also made some long grass. There a load of long grass in the video game and I wanted to get that feel. I had this old hank of ‘plumbers hemp’ that got left behind in a buildfing project years ago. I dunno what they use it for, but I think it is basically raw flax. It’s definitely not synthetic and looks just like dry grass …because it actually is dry grass. 
I also made a ladder out of MDF sprue and cocktail sticks. Scale is a little ‘heavy’ but it’s passable. I also reinforced the sandbags on the roof with some corrugated Iron, I added some tufts, painted a littl e more and weathered it up a bit more.
I found it really challenging trying to get the colour palette right. Those 50’s pastels, but rusted up and dusted down with earth colours. Sort of bright and dull at the same time. Needs work for other bits, I really want to try and get that colour palette from the game, it’s so distinctive. Oh and I boarded up the windows a little to fend off those pesky radroaches and mole rats, made a wooden shipping pallet and added that and some scatter lumbar under the overhang just for interest.

Thanks for looking,
Coop.
Awesome update! Nicely done. Really enjoying seeing the progress and process, being new to terrain creation myself.
I love the idea for the dry grass, and the rust colours you’ve gotten for the roof are brilliant!
Thanks man, yeah this is my first building too. I’m just ripping off loads of other peoples ideas and experimenting. I’ve perhaps overdone it a bit with the hut, but I’ve really enjoyed it and that’s what it’s all about, right? ![]()
Thanks man. I got some Vallejo pigments and I have become an instant fan. I love the dusty, earthy, ultra-flat look of em and have pretty much doused the whole model in em. ![]()
Might have to try picking up some pigments myself if I come across them 
This looks great, I love the long grass! All the little details you’ve added really bring it together and make it look lived in ![]()
I’m pretty sure The Terrain Tutor has a video on making sandbags from DAS, might be worth a look!
They are great, you wont regret it. Be warned, they are messy though.
Thank you man, that is very kind of you.
Yeah, I’ve seen it. It’s what made me think of it. I still want to try the sticky plaster round a lump of putty first though. I really like the way the sticky plaster looks like burlap.
OK, little side update. Bit of fun this.
Well, since I had put a stove pipe on the roof, I though it’s going to look silly without as stove …so I’d better try and make one. 
Easier said than done. OK, I dont know how this will turn out and it looks kind of awful at the moment, but these things have a way of coming good. Honest. 
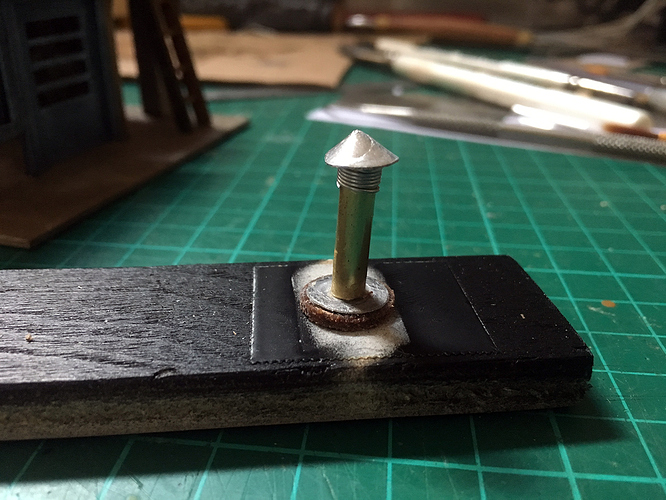
OK, first picture:
What you are looking at here is a small section of the barrel of an old pen, stuffed with greenstuff. On top is the wick holder from a burnt out tea light, which has had a BBQ skewer suffed through it and down into a hole drilled in the pen barrel. On the from is a bit of cardboard greenstuffed onto the pen barrel.
I need a base for it, so I drilled 4 holes into a bit of 2mm thick MDF and glued 4 cocktail sticks into them. Trimmed the sticks and sanded flush underneath.
Then I cut a bit of the same brass tube I used for the pipe on the roof and slipped that over the BBQ skewer. I wrapped a bit of wire around it to give it detail - make it look like a join or a damper or something. I added some cardboard detail to simulate a window, hinge and latch …and of course, what stove would be complete without a billy can?
OK, so it looks a bit naff. If it doesnt work out it’ll go in the bin. I’ve given it a coat of PVA to seal all the cardboard and am just waiting for it to dry, then I’ll give it a prime. It might be OK when it’s painted up. The scale works well though. It looks right to me.
Cool, I’ll look forward to seeing it. ![]() I might end up stealing…I mean being inspired by…that too
I might end up stealing…I mean being inspired by…that too ![]()
Your resourcefulness is an inspiration!  This thread is FULL of awesome ideas, but the stove and stovepipe really take the cake. And the grass. And the … oh, wait, at this rate, I’m just going to list everything in the thread.
Thanks man, I’m feeling the love. ![]()
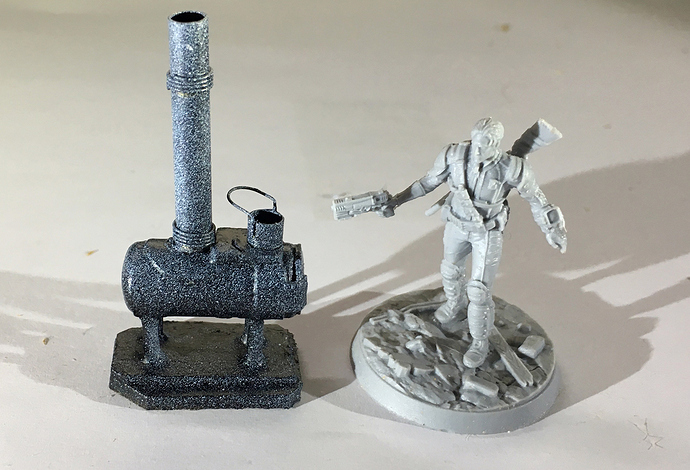
I’ve just gave the stove a dirty prime …and you know what, I think it’s worth a paint. I mean it’s not a resin model, but it cost nothing and I think if it’s painted up, it’ll look pretty good.
Looks a bit weird in the pics cos I primed it black then dusted with white to help me see the detail. It makes it look kind of pebble-dashed, but it’s flat, it’s fine.
Heh. The “pebble-dashed” look (and the shine) actually reminds me of an old ceramic-coated cook pot that my mom used to have. (Might still have, for all I know. I suspect it was an '80s thing, so not a style that would be Fallout-ish, per se.) It basically looked black but with a speckling of white spots. Anyway, that strikes me as an interesting approach to bringing out the details. I like having the figure in the picture for scale, as it helps me to appreciate just how TINY this custom work is. 
Loving the attention to detail and thought going into this project!
Thanks Alaiteir. I’m doing my best to do it justice and having fun learning loads of new stuff on the way.
I’ve given the stove a rough paint…

Looks OK. Some scale issues inside though, I dont have the space to do what I had in mind …especially not now there is a stove in there…

Looks good from the outside though…
I’ve put enough time into this hut now. I’m calling it done and moving on to the water tower.
Here’s the water tower to date:
So far, I went round all the vertical seams and joins and sealed them with greenstuff. The tower is octagonal and the MDF panels join with a sort of V showing and it looks rubbish. That’s the only issue with their octagonal models, the panel joins are not good and need some kind of seam sealer or filler. Anyway, easy job. Then primed and base-coated brown. I’ve started rustifying the water tower. I want it to look like rusted steel, so the whole tower is getting weathered and rusted with pigment powders. I’m using Humbrol Matte Cote as a carrier …which is an enamel varnish, thinned with Humbrol thinners …importantly, not water. The reason for this is because after I’m done rusting it, I’m going to go over it with Vallejo liquid latex mask. Then over the top of that, I’ll give it an all-over coat of pale blue paint. Then rub off the mask to reveal the rust underneath. The reason for the enamel varnish is to ensure that the pale blue top coat doesn’t reactivate or mix with the rusty base coat. It should keep the ‘layers’ very separate and I should get a nice clean lift where the masking fluid sits between them. All firsts for me, so we’ll see how it works out this next week or so.
On a side note, I’ve taken up woodwork…
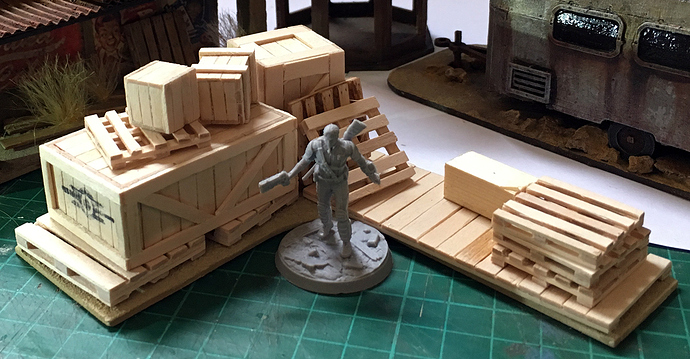
I bought a 1000 coffee stirrers off Amazon for £6 quid and I’ve been making all these crates, boxes, boardwalks, pallets etc. Brilliant fun and I love em.
I might do a separate ‘woodwork’ thread about making em, cos I’ve kind of got into a bit of a batch making process that seems to be pretty efficient and gives decent results.
I like the flames and the rust on the stove. Is the red light in the hut from an LED you’ve put in it?
Hopefully the weathering on the water tower goes well, I look forward to seeing the result!
Those crates look really good as well, should be useful as cover or searchable markers 


