Merchant Caravan Wagons, Fallout 1 Style

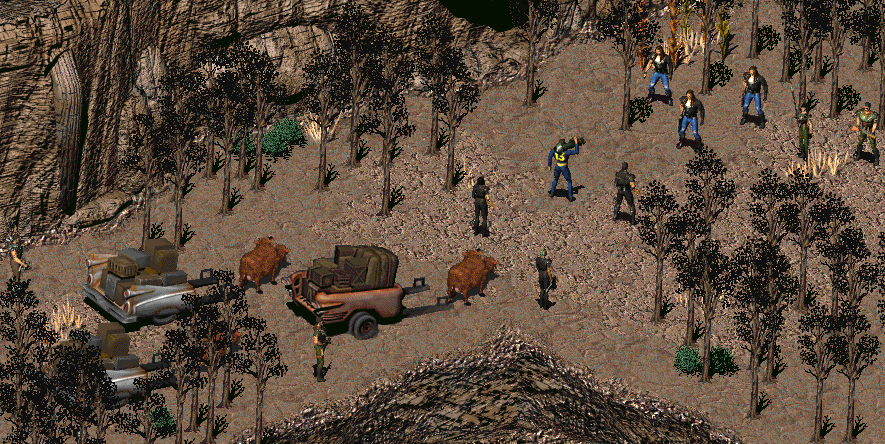
As of Fallout 3 and onward, you’d get the impression that merchants solely travel from point to point by loading up brahmin with barrels, crates, and satchels as much as they can manage. Well, in old Fallout 1, I was struck by how they portrayed caravan wagons as delightfully retro-post-apocalyptic by virtue of consisting of the back end of a retro car (complete with really BIG FINS) chopped off and its trunk laden with gear, then a couple of poles up front and a couple of handles that presumably could either by hauled by a team of determined wastelanders, or else maybe leather straps or whatnot were run through them to hitch up to a yoked brahmin.

We never actually got to see the caravan wagons in action – they were just stationary decorations, even when an encounter happened while doing an escort mission with the caravan – but I liked the look and feel. It’s a pity they didn’t show up even as background/furniture elements in Fallout 3/NV/4.

BloodwormFarmerCaravanTrailer1

So, here is my first take on the concept. The first challenge would be to find a toy car somewhere around O-scale (normally listed as “1:43,” but 1:50 or 1:48 should work as well) that can be chopped in half to serve as the trailer.

Toward that end, I made use of some old McDonald’s Happy Meal toys, circa 2006 (Pixar Cars). They’re PLASTIC, so they’re a lot easier to cut than metal O-scale cars. In particular, “Flo” seems perfect for the task, as this car has big, pronounced tail fins. I managed to get a “grab bag” deal on Ebay of a few assorted Pixar Cars toys from this set, and in such an assortment that I didn’t end up with too much that was grossly out of style. (Most of the character-cars in the first movie were classic cars, though going up to the 1960s, whereas the aesthetic of Fallout seems more grounded in the 1950s, roughly speaking.)

The toy was rather low to the ground, which probably isn’t all that befitting of a cargo trailer, so I added some larger wheels from a bag of model bits. They don’t need to (and actually SHOULDN’T) turn, so there’s no worry about making sure they fit on the same axle.

For added fun, I cut out the trunk panel, so that I could display an OPEN trunk, and stuff the interior with a bunch of cargo items (small crates, barrels, jerry cans, etc.). A couple of craft sticks serve as the forward supports. I put a small plastic spacer underneath the rear bumper area, since this model is very back-heavy – especially once I add in the cargo bits – in order to keep it balanced for when I have it “yoked up” with a beast of burden.

I didn’t happen to have any cow minis handy (two-headed or otherwise) that weren’t already burdened with cargo. On a whim, I took a Reaper Miniatures “Brass Bull,” made a rough “mold” of the head (out of Japanese plastic clay), then made a crude copy with epoxy putty, and then attached and blended it in. Tada! Brahmin BULL. Not that it’s necessarily directly related to the regular brahmin, but, hey, maybe these cows come in different varieties in the wasteland. (Mutations, you know?)

I modified the “not-quite-brahmin” mini to have a yoke on its back, fashioned from some bits of plastic sprue, wire, and putty. It’s not actually attached to the cart, so I can treat the cart as “scatter terrain,” OR I can include the bull and give it some stats and have a “protect the caravan” scenario.

6 Likes

That looks awesome! I’d have thought the back half of a car would be quite heavy as a choice of cart, but it certainly fits the aesthetic of Fallout :slight_smile: Let us know if you come up with a “protect the caravan” scenario!

Love it! :smiley: The only problem is that I’ve now added a caravan wagon to my list of things I want to build… :grin:

What a great idea. I’ve got to make one of these now too. :smiley:

I did see this on the Sarissa site for a £5-ver…

which could be kit-bashed together with a ‘50’s car’ to make something that might work?

Use the seats and wheels and some of the interior to make something sort of like this?

3 Likes

@CoopsMinis: I think a scrappy hybrid would be awesome! It would be more sensible than the original Fallout 1 trailers, leastwise: If the MODEL has weight balance issues, just imagine what the real thing would be like! :wink: I love the idea of a Western-style wagon that’s been souped up with more modern tires, and with obviously scavenged seating.

That’s one of the things I really love about post-apoc scenery-building: if nothing else, I can simply start welding together all my assorted leftover “bitz” and call it a scrap barricade! (Or stuff random spare body parts into a wad of epoxy putty, surround it in polyester net, and call it a meat sack.)

Here’s a WIP collage I put together while constructing my first trailer, by the way:

3 Likes

I think I have at least one 1/48 military car kit in my pile of random stuff - I might see if I can scavenge the chasis off it and see what I can do. Thanks for the WIP collage @JordanPeacock and thanks for that inspiration image @CoopsMinis … hobby plans derailed… :laughing:

2 Likes

The chassis and running gear from something like a Willy’s jeep or a WWII ambulance would be perfect.

Brahmin are a problem though. Do you know if Modiphius plan on releasing resin?

2 Likes

@CoopsMinis: Regarding the issue of Brahmin, here’s one way to go about it (until an official mini is released):

For the pack brahmin accompanying this traveling ghoul UltraSux 3000 vacuum cleaner salesman, I used a Safari Ltd “Farm Toob” I picked up at JoAnn Fabric a few years ago. The tractor is from the same “Toob” set. (Unfortunately, JoAnn Fabric no longer carries these “Toobs.” They’ve been replaced by different packs that seem to have more toy pieces, but also cost significantly more – like, $12.99 apiece for the new “Farm” set that only yields ONE plastic cow.)

The cow didn’t COME with two heads, of course. Option #1: Get two cows. Chop head off one, transplant onto other; use rest of cow as carcass or “meat bag” donor. Option #2: Use Instant Mold or Japanese plastic clay to make temporary “mold” of the head (for me, this was a 3-part mold), and insert putty to make a “casting” of the head. (This method works fairly well for “Toob” animals, since none of the details are terribly sharp or deep, and the head shape is fairly compact.)

In this case, I did it Fallout 3+ style, burdened with gear, so sadly this doesn’t make a very suitable trailer-puller. (And I’m not about to rip off all the gear and start over.) If I manage to find a plastic cow of the right size again (whether it’s in a thrift store, dollar store, or whatever – we no longer have dedicated TOY stores in the area, it seems, since Toys ‘R’ Us closed), then I’ll be back in business for manufacturing brahmin trailer-conveyance.

Lacking that, however, I’ve had to resort to fashioning OTHER mutant beasties to pull the rest of the wagons in my caravan, at least for the time being.

1 Like

@CoopsMinis
I’m not sure if they are planning to release them, I hope so. They are as iconic as Deathclaws, although a whole lot less threatening!

@JordanPeacock
I’ll have to see if we still have a toy store near me and what they have. If not I can at least make the cart, and use it as a scatter piece until I work out something to pull it!

1 Like

Yeah, I found this picture of the old style you’ve made…

…and it makes much more sense to have some kind of trailer pulled by Brahmin, rather than the 3/4 style of just overloading them with goods. I wonder why they switched? Anyway, if I was in the wasteland, I’d be making some kind of hybrid, walking dead style. There are plenty of old vehicles around to cannibalise and I’m darned sure someone would do it.

3 Likes

Yeah, that’s what I’ll do too I think. They dont have to be hitched up and if the build is scaled to the figures, it should be the same scale as the Brahmin if they eventually release them.

1 Like

@CoopsMinis: I figure the reason for the switch was because of the game engine. In the old Fallout three-quarter-view games, the trailer was basically just a terrain element, and a flat one at that: There was no animation attached to it, it couldn’t move across the screen, and we never got to see it at multiple angles.

If they’d tried to translate that into Fallout 3 (and onward), then they’d have to deal with a rolling model being towed by a brahmin. Now, I can think of various ways it could be done, but just sticking a bunch of boxes on a cow and calling it a day was probably a whole lot easier than trying to rig up special mechanics for towed trailers.


Also, here’s trailer #2 in my caravan:

Now, I’m pretty sure that somewhere in the “Fallout Bible,” it says that there are NO HORSES. Never mind those horses you might have seen in the “Fallout: New Vegas” comic book tie-in – that was “artistic license” and not canon. There simply are NO HORSES to be found anywhere in the Fallout universe. And also, by the way, there are NO CATS, since everyone knows that cats are extinct according to the canon.

(That is, unless you’ve played Fallout 4 onward. I guess the cat came back.)

Anyway, drat it, I’ve got a Toob of Horses, and I’m gonna use 'em! (At least until I can find some cheap cows.) I took a couple of slices off a round section of plastic sprue to make the air filter cylinders, and then made the rest of the horse’s harness and gas mask out of epoxy putty (various types).

The trailer itself is made from epoxy putty “cast” from a temporary Japanese-plastic-clay “mold” I made off of the back end of an O-scale (1:43) toy of a circa-1965 Chrysler convertible that I hadn’t the heart to actually chop up. (Besides, the putty’s a lot easier to chop and work with than die-cast metal.) The canopy is made of paperclip wire, with paper towel draped over them, glued in place, and then tinted and toughened a bit by giving it a couple of coats of acrylic paint.

The teddy bear is freehand-sculpt epoxy putty. They’re actually pretty easy to make.

3 Likes

I always thought that the cats were cloned up by the Institute and then escaped. Although, that’s just my fan theory

I think my current plan is to put a temporary cross bar in place so it could be pushed by people. But not glue it, so I can work out a yoke for Brahmin if they do arrive or I find something to chop into shape! That means I can switch between the two…in theory!

2 Likes

And here’s my third caravan trailer. I think this ought to do me for now – I’ve filled up the last space in my foam-tray APC box dedicated to my road wrecks, bikes, and caravan trailers. (It’s not enough for me to build this stuff, but I want to make sure I have a place to safely store it all, too, which fends off some of my wilder ideas for building.)

As with trailer #2, the main body is a putty “cast” of an O-scale Chrysler toy, though I actually made two different partial “casts” with putty. For the first, I deliberately left out the putty in the area over the trunk, whereas for the second, I just applied a thin layer of putty lined up with the bounds of the trunk lid. I had a little overlap on each, so I could shave down the excess putty to make it look like they’d fit together and – voila! I have the trailer-with-open-trunk, and an open lid, so I can put some cargo inside the trunk (but then pile a bit more on top, because of COURSE that’s what would happen).

The cardboard box is a little papercraft model I made a while back. (It’s a bit time-consuming to fold all the tiny boxes, but they’re great with a few pallets to set up a “warehouse” scene. Of course, it also means I can spare a few for projects like this.) The cans of “Greasy Prospector Pork & Beans” are just paper printed labels wrapped around sections of (chopstick) wooden dowel. The “Cram” cans are similarly just paper labels wrapped around scraps of balsa wood.

I used another “Horse Toob” plastic horse for the beast pulling the wagon, but this time I decided to go with what seems to be a common mutation for herbivores in the Fallout universe: two heads! Just to be weird, I put the seams for my three-part mold of a “Horse Toob” head over the eyes, to exploit some of the distortion that happens when I make multi-part “molds” in this way. On the one side, I ended up with double impressions on the right eye, whereas on the other, I ended up without any identifiable eye at all.

My plans for a “four-eye” pony head were dashed, but I decided to just roll with it, and paint it up with two eyes on the right side of its face, and just a purplish patch on the left where there should have been an eye socket. I get mental images here of the bizarre phenomenon of flounder eyes … but it’s probably best not to dwell on that too much. Maybe it’s sort of a mutation-adaptive thing that when you’ve got TWO heads, the inward-facing eyes aren’t nearly as useful as having another eye on the outside? Or whatever. It’s freaky and mutant-looking, anyway, so that’s what I was going for.

Also, I can’t remember if I mentioned how I came up with the “broken highway” look here. At the risk of repeating myself, the caravan trailers are posed on some Secret Weapon Miniatures “Tablescapes” terrain boards. Sadly, they’re out of production (legal shenanigans and the perils of having your product manufactured by a third party, I’m given to understand) but they’ve still got a large stock of them, and I’ve picked up boards of several styles, since they link together and are pretty durable, hence ideal for my games where I have to travel and then set up. For the “wasteland” look, I used some “Rolling Hills” terrain tiles, which are usually portrayed as being painted up in grassy greens, but instead I spray-painted them a rusty brown and dry-brushed with “parchment” (off-white). For the road itself, I used some blobs of Apoxie Sculpt epoxy putty (I had some that was dyed black) and mashed them out onto the terrain boards, then applied a “texture stamp” (more Japanese plastic-clay) to apply a nice cracked look to each one. As the putty started to cure, I went in with a hobby knife to tear a bit at some of the edges for a more crumbly, less “squashed-and-round” look. Once it all cured, I dry-brushed with a mid-tone grey, and then painted the patchy remains of divider lines (using some stretched masking tape to help me keep things lined up).

The terrain boards pictured with my original trailer are from the “Scrap Yard” theme – same basic textured terrain that could be painted up as grassy, muddy, or bare soil, but with the occasional tire, barrel, container, truck grill, cable, or other detritus peeking up through the ground. Design elements are shared between the “Scrap Yard” tiles and their “Scrap Yard Barricades,” so they fit well together. The exact tech level of the junk portrayed is a bit vague, and IMHO it fits nicely enough with Fallout-themed terrain – though I’ve modded mine a bit by adding a few distinctively “Fallout-branded” elements, such as wrecked Protectrons, vending machines, etc.

4 Likes

I followed a lead on where I could find a Safari Ltd “Down on the Farm Toob” – at Michael’s – and ended up picking one up, even though it has gotten pricier since last time. (At least I had a coupon.) My original plan was just to make up another brahmin, but the pack also included a small tractor and a trailer, so I decided to transform the trailer into yet ANOTHER merchant wagon loaded with junk.

For maximum flexibility, the brahmin doesn’t actually have a yoke sculpted onto it, and isn’t attached to the wagon; if desired, I can separate it, and just have it be an ordinary, un-yoked, un-burdened brahmin. (I may make a set of pouches, barrels, etc., to serve as a load on its back, but even so, my intent there would be to make it a removable piece.)

For the brahmin, I took the cow from the “Down on the Farm Toob,” and used Japanese plastic clay to make a 3-part temporary mold of the head, then made an epoxy casting. (The mold seemed to hold up well enough that I could probably get another couple of “casts” out of it. Hmm. Maybe I should make one of those mounted brahmin-head wall trophies for a silly diorama or building interior. :wink: ) I removed the original head, then reattached it with some wire and some gap-filling putty at an angle, and attached the other, new head for the other side. It’s based on a Secret Weapon Miniatures cobblestone street resin base.

For the trailer, I used the trailer that comes in the Toob, but I snipped off the hitch/stand where it would attach to the tractor (and that also doubled for allowing the piece to stand on its own). I built a frame with some scrap mat board, “craft matchsticks” and a random plastic bit (some sort of 40K piece) from a “bitz box” that I got from a friend when he was clearing out his garage in preparation for a move. The contents in the back of the trailer (glued down to a mat base, so I can remove the whole load and replace it with something else if necessary) are mostly comprised of random other bits from the same collection. The mug, bottle, jug, and crate are all Hirst Arts Castlemolds castings in Hydrocal.

The combined model is posed on a Secret Weapon Miniatures “Tablescapes” terrain tile (“Scrap Yard” theme).

The Toob also gave me a cow-sized pig, a cow-sized chicken, a cow-sized barn (that is, approaching N-scale) and several other grossly-out-of-scale pieces, and I might try to figure out how to work them into other terrain pieces. Namely, that I wouldn’t want to represent a GIANT CHICKEN, per se, but I was thinking about having a “generic” restaurant building, and then changing its purpose by having more than one sign outside to choose from.

(For the chicken, I’m thinking of perching it atop the sign for a chicken restaurant – CHICK-A-BOOM – and for the pig, possibly a barbecue – A-PORK-A-LYPTIC BBQ. All the ideas I have for the sheep in the set are even worse puns. I might just save the barn to go with some of my N-scale road-warrior vehicles I use for my Mad-Max style Fallout-themed highway battles, as some random off-the-road decor.)

5 Likes

That looks great. I’ll have to check out a farm set at Michael’s. You can always cut the doors off the barn and make it a Dogmeat House. :slight_smile:

1 Like

Okay, I suppose this hardly qualifies as “Fallout 1 style” anymore, but I still decided to whip up another addition to my caravan: a heavily-modified “deluxe” promotional version of Giddyup Buttercup, rigged with a couple of fusion cores, and heavily armored (especially on the back side) to serve as heavy-duty conveyance for a wagon loaded up with munitions. (That way, if idiot raiders attack and target the ammo stock, and everything goes kablooie, well, at least you don’t lose a decent pack animal, and the Giddyup Buttercup has a better chance of surviving.)

The model is an old Mage Knight “Steam Horse” mini painted up in a style reminiscent of Giddyup Buttercup (as portrayed in Fallout 4, anyway), whereas the wagon is another piece from that “Down on the Farm Toob.”

I based the Giddyup Buttercup on a Secret Weapon Miniatures “Town Square” themed bike/cavalry base. (I know that’s not a kind of base used in F:WW, but for scenario purposes, this thing is really just an objective piece moved on a prescribed path a prescribed distance each turn – not a combatant – so I figure that having a round base isn’t that important. Having a perfectly round base large enough to accommodate the length of the model would just make it that much harder to make sure there’s a clear path across the table for the caravan to traverse unless/until it’s destroyed or obstructed by the opposing force.)

3 Likes

Love the Giddyup prozy. Very nice.